Category Archives: Technical

Print Multiple Certificates Automatically

Say you need to print a batch of Certificates for the participants of your training class. Are you going to print the Certificates one by one with the individual names or let Word’s Mail Merge function do that for you automatically?

Start with the design of the certificate. Check out Word’s templates https://templates.office.com/en-us/templates-for-word

After you have customised your selected Certificate template, get your list of participants’ names. I suggest you create the name list in Excel and call it, say, “Participants”. Let’s say the names are in column A. Label cell A1 as “Name”. The names are in cells A2 to A20, say.

Open your Certificate template in Word and leave your cursor on the spot where the names will be printed. Go to Mailings and click on Insert Merge Field, select the label “Name” from the name list “Participants”. Next at Mailings -> Start Mail Merge -> Step-by-Step Mail Merge Wizard. Follow the steps. When asked to Select Recipients, use an existing list and browse your PC for the name list “Participants” that you created earlier. Finally, complete the merge and Print. The Certificates will be printed one-by-one with the names from the name list.

New Life For A Windows XP, Vista Notebook PC

Support for Windows XP  ended on April 8, 2014 while support for Windows Vista ended on  April 11, 2017. So unless you wish to pay about RM130.00 for a new Windows 10 licence, your Notebook/PC is practically useless because many new programs will not run on XP/Vista and moreover your device is now a security risk.

That was the situation facing me with my wife’s HP Mini (Intel ATOM) notebook. It had Windows XP and was incredibly s-l-o-w. I was prepared to junk it when I decided to ask Uncle Google what can I do with it. Oh joy! I found this article https://www.computerworld.com/article/3033439/windows-xp-upgrade.html and it works! I will summarise it below:

The answer is in a service called CloudReady that converts old computers into  cloud-centric Chromebook-like systems. It’s provided free of charge to individual users by a company called Neverware. The CloudReady OS is based on Google’s Chromium OS, the same open-source architecture as Chromebooks and Chrome OS. Neverware has different pricing plans for Enterprises and Education Instituitions, but it available FREE for personal home use (with some limitations).

If you want to convert your old notebook/PC to a CloudReady Chromebook-like device that runs Google apps instead of Windows programs, here are the steps.

  1. Check that your old notebook/PC is compatible with CloudReady. https://guide.neverware.com/supported-devices/
  2. Check CloudReady’s critical requirements. https://guide.neverware.com/technical-details/#minimum-ram-requirements
  3. Make sure you have a good working Internet connection.
  4. Backup all your data from the target notebook/PC, as the installation will reformat your hard disk and wipe out everything.
  5. Download/create the installer on a USB stick, 8GB or more, using another PC (with Windows 7 or newer) with a Chrome browser. Be sure to use a blank USB stick as it will be reformatted to make the installer. https://usb-maker-downloads.neverware.com/stable/cloudready-free/cloudready-usb-maker.exe
  6. Use the Automatic USB Maker for simplicity.
  7. Make sure the target device is turned off. Plug in the USB Installer to boot from the USB stick. For my HP Mini, as I turned on the power, I clicked F9 repeatedly until I see the boot-up options on the screen. Select the boot from USB option. You should see a white splash screen with the CloudReady logo.

8. After the white splash screen with the CloudReady logo, you will see the Welcome Screen. Look for the digital clock on the lower right hand corner and click on it.

9. Be sure you have backed up your data. As the installation proceeds, the hard disk will be reformatted. Click the clock and then the Install OS option.

10. After the successful installation, you get a Welcome screen. Click on the Let’s Go…. Connect to your Network, Data Consent, and finally Sign-in with your Google account. That’s it…..

That’s it…your Windows XP computer is now an Android-like, Chromebook-like device. Use it for your Gmail and run Google apps. Enjoy!

How To Convert Case In Excel

Recently I was given a list of participants in a seminar and I was required to print out a certificate of attendance for each of them. The problem was the names were all in Uppercase. That would make the printout on the certificates look bad. I had to change them all to Propercase before merging with the Certificate template in Word for an automatic printout of the certificates. Luckily there is a simple formula to do that in Excel where I had copied the list of names.

Consider that the names are in column A. Now we are going to convert the UPPERCASE names in column A to Propercase in Column B.

In cell B2, type =PROPER(A2), then press Enter. This formula  converts  the name in cell A2 from  uppercase to proper case. To  convert  the text to lowercase, type =LOWER(A2) instead. Use =UPPER(A2) in cases where you need to  convert  text to  uppercase, replacing A2 with the appropriate cell reference.

How To Adjust The Display Size of a WordPress Video

First, a suggestion: it may be better to just embed a video link to your video file hosted at a 3rd party site like YouTube as the video file will consume precious storage space on your website.

Nevertheless, there’s a case to be made for uploading a video file as an attachment to your article if it makes the article more compelling when the video is played in-situ.

Uploading and inserting the video into your article is straightforward enough. But there’s no dimension editing capability in the media library. To adjust the display size of the video, turn on the TXT or Source Code in the block and edit the dimensions within the code. It is not so straightforward but easy enough.

How To Increase Upload File Size Limit For WordPress

You know the awful feeling, when you are putting the final touches to your great article of the day, but the awesome image and/or video file just cannot upload due to the ridiculously low maximum file limit set in your media library.

The limit (something like 2MB) may be a default setting, which you can change yourself, or it could be a system limit set by your webhosting provider, in which case you need the webhosting provider to change for you.

If you Google for a solution, you will learn that there is no built-in ability to change within WordPress itself (why?). Invariably, the method calls for inserting some code into the .htaccess file or function.php file or php.ini file. If any of those does not work, then you need to contact your webhosting provider to do it for you.

If you intend to add code in any of the files mentioned above, you generally have to FTP download the file and edit it and then FTP upload it back. But here is a neat way to modify your php.ini file without the neccessity for FTP nor writing any code.

Go to your domain cPanel and look for MultiPHP INI Editor, in the Software section. Select your website from the dropdown menu and all the various parameters are there, including the Upload_Max_Filesize. By default, the  maximum upload size in WordPress  ranges from 2MB to 150MB depending on the settings of your web hosting provider is giving by default. I recommend you to put at 64MB. Here’s a peculiarity I discovered. My webhosting provider generously set for me 200MB but my WordPress websites all default to 2MB with that setting. I had to step it down to 64MB and it works. You may experience the same thing.

Chkdsk /r

One day you will sense that something does not seem to be going right with your notebook.
It could be any one of the following symptoms:

1. A sudden strange sound from your audio.
2. Your mouse becomes very unresponsive and may even freeze.
3. You cannot even shutdown and CTRL-ALT-DEL is not responsive.

All the above could indicate a progressively failing disk drive, starting with a bad sector.

Take urgent steps as follow:

1. Hold down the power switch to force shutdown.
2. Wait a while, then reboot.
3. Hopefully you are able to reboot into a working desktop. Scroll through the apps, go to Windows System, Command Prompt, right-click to Run as Administrator.
4. At the Command Prompt, type chkdsk /r
5. May have to shutdown, for the computer to execute on restart.
6. If the computer at some point, seems to hang or freeze at say 19% or something like that, give it time to complete. It may take a very very long time ( hours or overnight) but it should eventually overcome the bad sector that caused the problem.

Now the notebook will behave well, but quickly go change the hard disk and save the data while you can.

How To Protect HDMI Inputs From Being Toasted By Lightning

So you have a super duper Home Theatre system complete with a jiffy HD Projector and a top-of-the-line AV Receiver linked by a 50-foot (15-metre) HDMI cable that snakes overhead in the ceiling. One end is connected to the HDMI input port of your overhead HD Projector while the other end is connected to the HDMI input port of your AV Receiver across the room.

What happens when there is a severe thunderstorm and there is one or more lightning strikes nearby? Does your system go on the blink? If yes, then you share the same bad experience as I have. The close proximity lightning strike has induced a large voltage spike  in your long HDMI cable that completely toasts your HDMI ports. If you’re “lucky” then maybe only either the Projector’s or the AV Receiver’s  HDMI port gets toasted. More likely, both will be zapped.

After that has happened to me 3 times in as many years, I decided to be proactive as I was getting embarrassed submitting my home insurance claim every year. Not to mention the inconvenience of the downtime pending repairs. I installed my solution early this year and having survived 2 severe thunderstorms since the installation, I am confident this is a viable solution. Read on.

hdmi-switchThe solution calls for two HDMI Switches. I searched for a simple 2-to-1 HDMI Switch but the simplest I found is this 3-to-1 HDMI Switch. I wanted a mechanical switch but finally settled for this electronic switch because it has a remote. This makes the switching convenient when the switch is mounted at the Projector, ceiling-high.

projector-hdmi-switchInstall one of the HDMI Switches to the HDMI Ouput of the AV Receiver. In my case, I connected Port 3 of the switch to the AV Receiver’s HDMI Output. The switch’s output port is then connected to the long HDMI cable. The other end of the AV-receiver-hdmi-switchHDMI Cable connects to Port 3 of the second HDMI Switch mounted at the overhead Projector. The output port of this switch connects to Projector’s HDMI Input port. That’s it. When the system is on, I use the remote to switch to Port 3 of both switches. When I have finished viewing, I switch to the un-used Port 1 of both switches, before shutting down the system.

The cost? Only RM80.00 (USD24.00) for each HDMI Switch.  I reckon that in the event of a really bad lightning strike, it’ll be a USD24 fuse. But so far, neither switch has failed.

Does this help you? Share your experiences here.

Rip, Compile and Burn Audio CD

Rip, Compile and Burn Audio CD

At some time, if you are a music buff, you may want to compile your own awesome playlist on an audio CD. And I don’t mean the MP3 compilations as you know MP3 is a lossy format. No sir, you want a compilation of the original lossless tracks, which means you have to rip or download or copy a track in either FLAC or WAV or WMA, which are lossless formats. Now, at this point if you start asking which of the three formats is the best to use, you’d be opening up an endless debate. But if you were to ask which one I use, I’d say all three but for the last-but-one stage I use WAV. Why WAV? And what about the final stage? Read on….

Disclaimer: What follows may not be the best or optimum way to rip, compile and burn an audio CD. However, it documents the methodology that I have finally settled on, after countless coasters made from useless CDs. Hopefully this will spare you the frustrations that I had endured up to now.

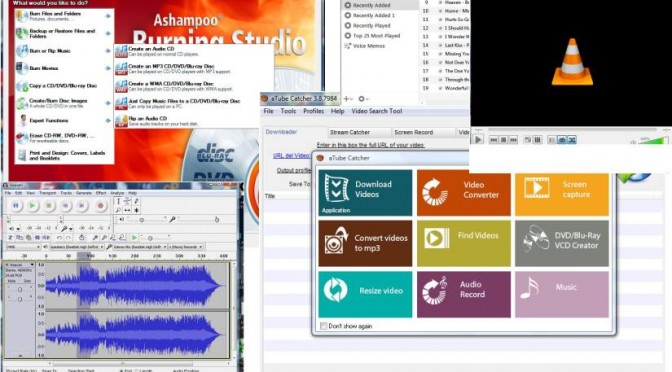
The free Tools I use:

1. Ashampoo Burning Studio

2. VLC Media Player

3. aTube Catcher

4. Audacity

5. iTunes

6. Windows Vista Acer Notebook with CD/DVD player/burner

1. To rip an audio track from a music CD, I use Ashampoo Burning Studio and rip it in the lossless WAV format.

2. To get lossless FLAC high quality audio tracks from the Internet, use Bit Torrent to search and download.

3. Use aTube Catcher to record streaming MP3 tracks and convert to WAV (yes, I know…the MP3 tracks are already lossy…but if no choice, then MP3 will do. Convert to WAV just to keep all the files in same format).

A great website to download MP3 songs is http:/grooveshark.com/

4. Two ways to convert FLAC to WAV.
Use VLC Media Player to convert the downloaded FLAC files to WAV.
Media->Convert/Save->Add (the Flac, MPEG4 files)->Convert/Save as Audio-CD (WAV).

5. Or use Audacity to tidy up the files (cut off excessive silence front and back; and also to normalise the track to avoid clipping due to excessive amplitude). Open the FLAC files, edit and Export Audio as WAV.

6. Steps 4 and 5 convert the tracks to WAV as iTunes does not recognise FLAC. Transfer the final WAV tracks to iTunes’ Library as a Playlist.

7. Use iTunes (the icons at the lower left corner) to burn Playlist to CD as Audio CD.

8. Caution:

a. Check capacity of the blank CD and the total tracks size. iTunes does not check this and will give an error (the dreaded 4450 code) at the end!

b. Avoid the “Burn At Maximum Speed Possible”…..again iTunes only gives the error at the end, if your CD brand cannot handle the high speed. After iTunes has made me a bundle of coasters, I wised up and throttled the burn speed down to 8X, which worked for me.

c. If you want the track names to be displayed by your CD Player (if it has this feature), then be sure to check “Include CD Text” before burning.

Footnote:

Why not just use Ashampoo Burning Studio to rip tracks from CDs to WAV or WMA format and burn the compilation as WMA (or WAV)? Unfortunately not all CD player plays WAV/WMA formats. That’s why I use iTunes to burn an Audio CD for full compatibility in all CD players.

If your CD Player supports FLAC, WAV or WMA, and you don’t intend to play your CD anywhere else nor share with anybody else, then just use a Burn Software (eg. Ashampoo Burning Studio, Nero, etc..) to rip the tracks into WAV or WMA format and burn the CD with either one of the formats to cut down the complexity of all the foregoing convoluted steps.

Remove a WiFi Network From Your Computer

One day you may suddenly experience a jerky, intermittent streaming of your favourite FM station on your PC. What happened? After all you have the whole 10Mbps bandwidth to your greedy self in your home castle. Read on for a possible scenerio.

Now you recall…a week ago, your service provider failed and your kind neighbour offered you the temporary use of his WiFi, which you can access from your house. One week later, you may have forgotten and your PC still automatically latches on your neighbour’s WiFi because depending on where you are sitting in your house, your neighbour’s signal may be stronger than your own WiFi. Now recall further that he subscribes to a different service provider and he has a slower connection ( 4 Mbps? ) compared to your 10 Mbps. Ah, so that’s why you experience such poor audio streaming of your favourite FM station. So how to remove that slower WiFi Network?

1.  Go to your Windows Control Panel and click on Network and Sharing Centre.

2.  Click on “Manage Wireless Networks” on the left hand menu.

3.  Right-click on the wireless network that you want to remove.

4.  The pop-up context menu offers you the option to “Remove Network”. But hang on….maybe you should just click on “Properties” and remove the automatic connection. Then you still have the option to manually connect if you need to.

Time to have tea now.


Hide Site Title

WordPress is now an incredibly popular way to build a fully functional website from the traditional blog base. In fact WordPress.org is now a full-blown CMS in its own right. With lots of templates, many of which are free, it is easy to see why it is so popular.

header-text600opt

Let’s assume you now use a template (say, Twenty Twelve) to create your website. While it allows you to write your Site Title and Site Description (Figure 1), chances are that you will want to replace it with a snazzy logo title image (Figure 2). Why would you  want to do it? Well, the most compelling reason is there for you to see. Which one looks better?

header1-logo600opt

But why don’t you just select the desired font type and size and colour instead of creating an image? Simple answer is that you want to be sure that all visitors on all machines with all browsers (ok, ok….almost all) will see the same  snazzy logo title image. If you just changed the text font type….some machines and/or browsers may not have that font installed and they may end up seeing your title in (probably!) boring Arial or Times Roman! Certainly not what you intended in your site’s design.

OK, now you have replaced the text title with your image logo-title. So that’s simple enough, what’s the problem? Well…you soon learn that without the text site title, your SEO sucks. For your SEO ranking, the appropriately named site title and site description are critical because they are picked up in the meta title tags. So what’s the solution? An easy obvious way is to choose (in the template) not to display the header text. That way, the  site title is hidden and yet it is still picked up in the meta title tags. But the tagline is part of the header text and gets hidden as well. The solution is simple! Display the header text (site title and tagline) but hide just the site title instead. How? Colour the site title text the same as your background (eg. white, or whatever). The search engines’ crawlers do not care what the colour is, they will still pick up the site title text. (Figure 3). So you can have your cake and eat it too! By choosing to display the header text, the site’s tagline or description remains visible, which is normally desired.

header2-logo-text600opt


Of course, you should customise your template using a Child Theme and the code chnage in its CSS style sheet as follows:

.site-header h2 a {
color: #ffffff;
display: inline-block;
text-decoration: none;
}